WooCommerce Looker Studio Connector
Start Making Data-Driven Decisions
Connect WooCommerce to Looker Studio (formerly Data Studio) and use the included templates to get answers to the key questions that will enable you to figure out what is working and what is not with your marketing, and take action to grow your WooCommerce Business.
- No credit card required
- Cancel anytime
Free WooCommerce Looker Studio Templates!
The WooCommerce Looker Studio Connector gets your WooCommerce data into Looker Studio, but in order to make data-driven decisions, an Actionable Dashboard needs to be created with the data.
However, if you don’t know what to pay attention to in order to make decisions, creating an Actionable Dashboard from scratch can be challenging and take some time. To speed things up, we have created Actionable WooCommerce Looker Studio Templates that you can choose from, to suite your needs. You can use them as is, or as a starting point to speed up your dashboard creation process.
WooCommerce | GA4 Starter Template
What questions does this template help you answer?
Overview
This section has the Actionable Dashboards so you can quickly get answers to questions such as.
- Are my sales and sessions trending up or down compared to the previous period?
- How is my ecommerce purchase conversion rate performing?
- What is my average order value and how is it changing?
- Which traffic sources are driving the most revenue?
Orders
-
- Which products are generating the most revenue?
- What is my average order value over time?
- How are my orders and revenue trending day by day?
- Which products are selling and which are not?
GA4 Ecommerce Funnel
- Where are shoppers dropping out of my funnel – from item view through to purchase?
- Which sessions lead to purchases and which don’t?
- Which landing pages are starting the most sessions?
- Which traffic sources and campaigns are driving engaged sessions?
Note, if you are using the WooCommerce Subscriptions plugin, you will be able to use subscription data with the connector. However, a page for Subscriptions is not included in the template as this would cause an error for users who are not using Subscriptions.
Resources
Resources available in the WooCommerce Connector include:
- Coupons
- Customers
- Orders
- Payment Gateways
- Product Attributes
- Product Categories
- Product Reviews
- Products
- Product Shipping Classes
- Product Tags
- Refunds
- Settings
- Shipping Methods
- Report: Top Sellers
- Shipping Zones
- System Status
- System Status Tools
- Tax Classes
- Tax Rates
- Webhooks
Note, if you are using the WooCommerce Subscriptions plugin, you will be able to use subscription data with the connector.
Start Making Data Driven Decisions Using The WooCommerce Looker Studio Connector
The WooCommerce Looker Studio connector together with the included Actionable Dashboard Templates allows you to start making Data-Driven Decisions fast!
How It Works
1
Sign-Up to a Plan
Sign-up to the Solo Plan using a Google Account. Use the same account to use the WooCommerce Looker Studio Connector.
2
Connect WooCommerce to Looker Studio
Authenticate and connect WooCommerce Domains to Looker Studio.
3
Start Creating Actionable WooCommerce Dashboards
Use data from WooCommerce to create Actionable Dashboards in Looker Studio.
Pricing To Suit The Stage Your Business
Connector prices are based on the plan you choose/have
Solo
For a user who needs one to a few connectors, usually for their own needs
$
0
/mo
- 1 User
- First WooCommerce domains free
- All other connectors one or more accounts free
- Additional Users
WooCommerce Domains
USD Monthly
Consultant
For a user that needs many different connectors. Eg to work with many clients
$
60
/mo
- 1 User
- First WooCommerce domains free
- All other connectors one or more accounts free
- Additional Users
WooCommerce Domains
USD Monthly
Team
For multiple users needing many connectors. Eg staff of an agency with many clients
Coming Soon!
$
120
/mo
- 3 Users
- Additonal Users ($5 each)
Domains
USD
How To Get Started?
First Sign Up to a Plan
Create a Google Account if You Don't Have One
If you are not signed into a Google account in the browser you are using when you click the Try button, you will be carried to the Looker Studio Overview page.
When you click the USE IT FOR FREE button, you will be presented with Sign in with Google screen. Sign in with a Google Account or click Create account to the bottom of the page to continue to Looker Studio.
Choose a Google Account to Sign-Up
Sign up and access to the connector is based on the Google Account used. Make sure you are signed in to the Google account you want to use in the same browser before you click try.
For users that use many Google Accounts in chrome however, it can be tricky to select the account you want to use, if it is not the default account. This is because the current behaviour of Looker Studio sends the user to the home screen when they attempt to change their account from the default, using the Google Account selector to the top right. The easiest way around this is to make sure to set up a Profile in Chrome for the Google Account you want to use, and switch to that Profile.
Click the Authorise Looker Studio Button
Looker Studio is a Google product and the WooCommerce Looker Studio Connector must use your Google Account to function. Thus, the Connector must be granted permission to use your Google Account to get your WooCommerce data into Looker Studio Connector.
Click the AUTHORISE button start the process.
Select a Google Account to Authorise the WooCommerce Looker Studio Connector
After clicking the AUTHORISE button, a list of Google Accounts that you are signed into the browser with will be presented. If the Google Account you want to use is in the list, select it. If it is not, select Use another account and sign-in with the account you want to use.
This account selected will be used both to use the WooCommerce Looker Studio Connector and Sign-up with a Plan.
Review What is Shared
Review what your Google Account will share with the WooCommerce Looker Studio Connector and click the Continue button.
Authorise the WooCommerce Looker Studio Connector
In order to connect your WooCommerce data to Looker Studio the WooCommerce Looker Studio Connector must be allowed to Connect to an external service.
Click the Allow button to Authorise.
Select a Plan
- Select the free Solo Plan to get started.
- Click Next until the Autorisation screen in presented.
- Click the AUTHORISE button to begin signing up to the Solo Plan
Review Your Order
Review the order and click Proceed To Checkout.
Enter Your Name and Email
Enter your first and last name.
By default the email of the Google Account you used with Looker Studio is populated (if changed it must be an email of a Google Account you intend to use with Looker Studio).
The email used will also be the main email associated the subscription.
No billing information is required to get started!
Complete You Order!
Click the subscribe button to get the Solo Plan.
Connect WooCommerce to Looker Studio
Generate WooCommerce API Keys
- Log into WordPress
- Go to WooCommerce -> Settings
- Click the Advanced tab and then the REST API sub-tab
- Click the Create an API Key button
- Input Description
- Select User
- Select Permissions as Read
- Click the Generate API key button
- Copy Consumer key and store safely (to be used in Looker Studio)
- Copy Consumer secret and store safely (to be used in Looker Studio)
Add An Account
- Select Add an Account from Connector Management
- Click Next until the Credentials screen is shown
- Enter WordPress Domain into the Path field
- Enter Consumer key into the Username field
- Enter Consumer secret into the Password
- Click the SUBMIT button
Start Creating Actionable WooCommerce Looker Studio Dashboards!
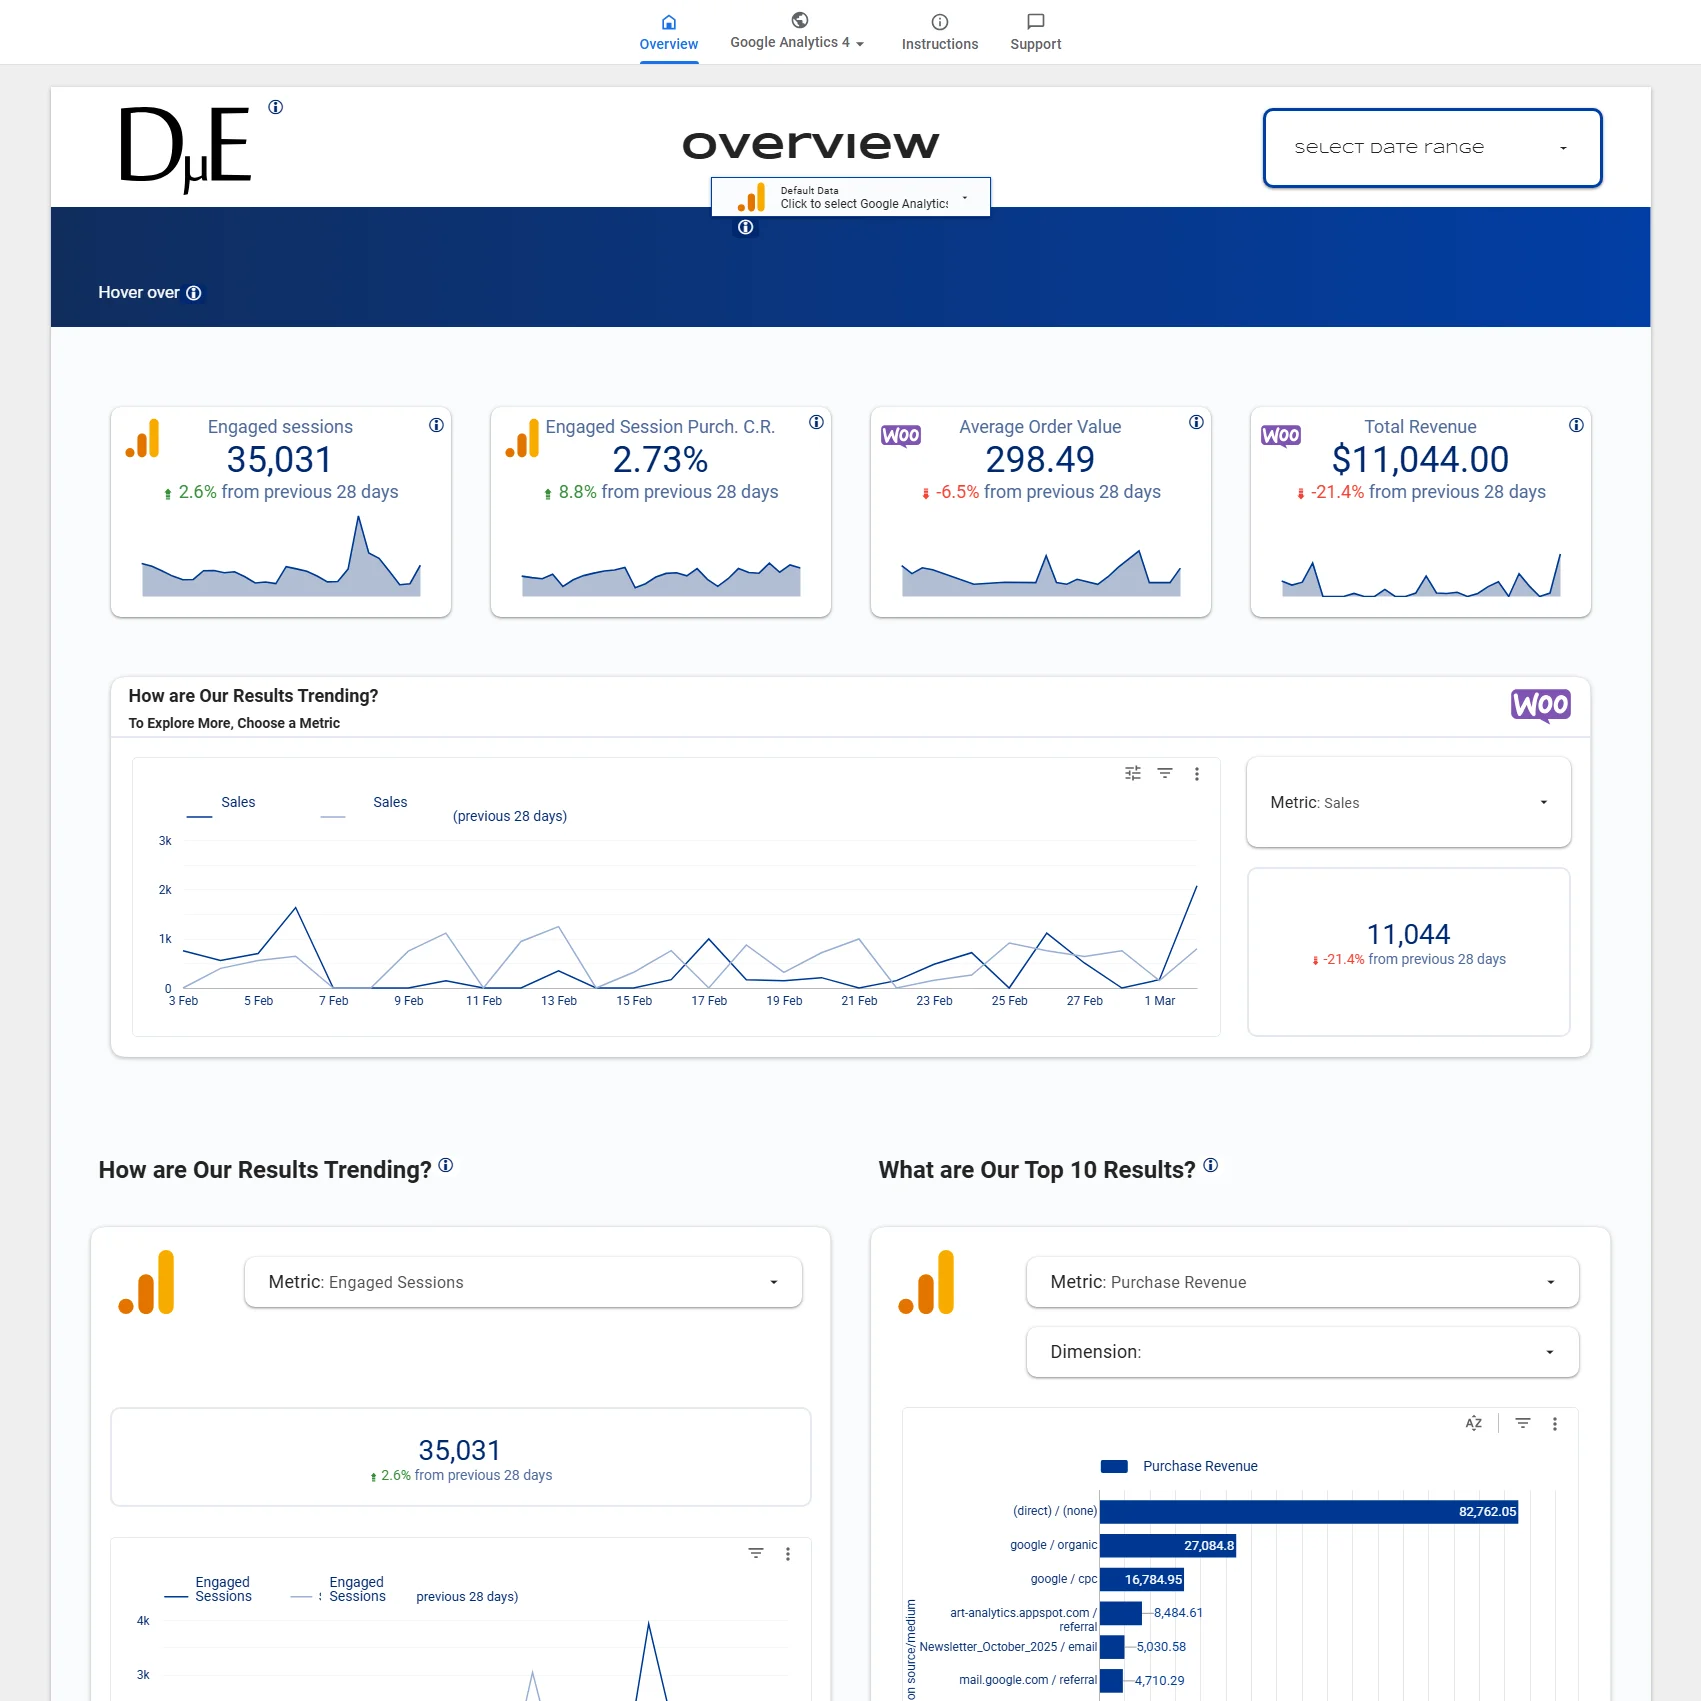
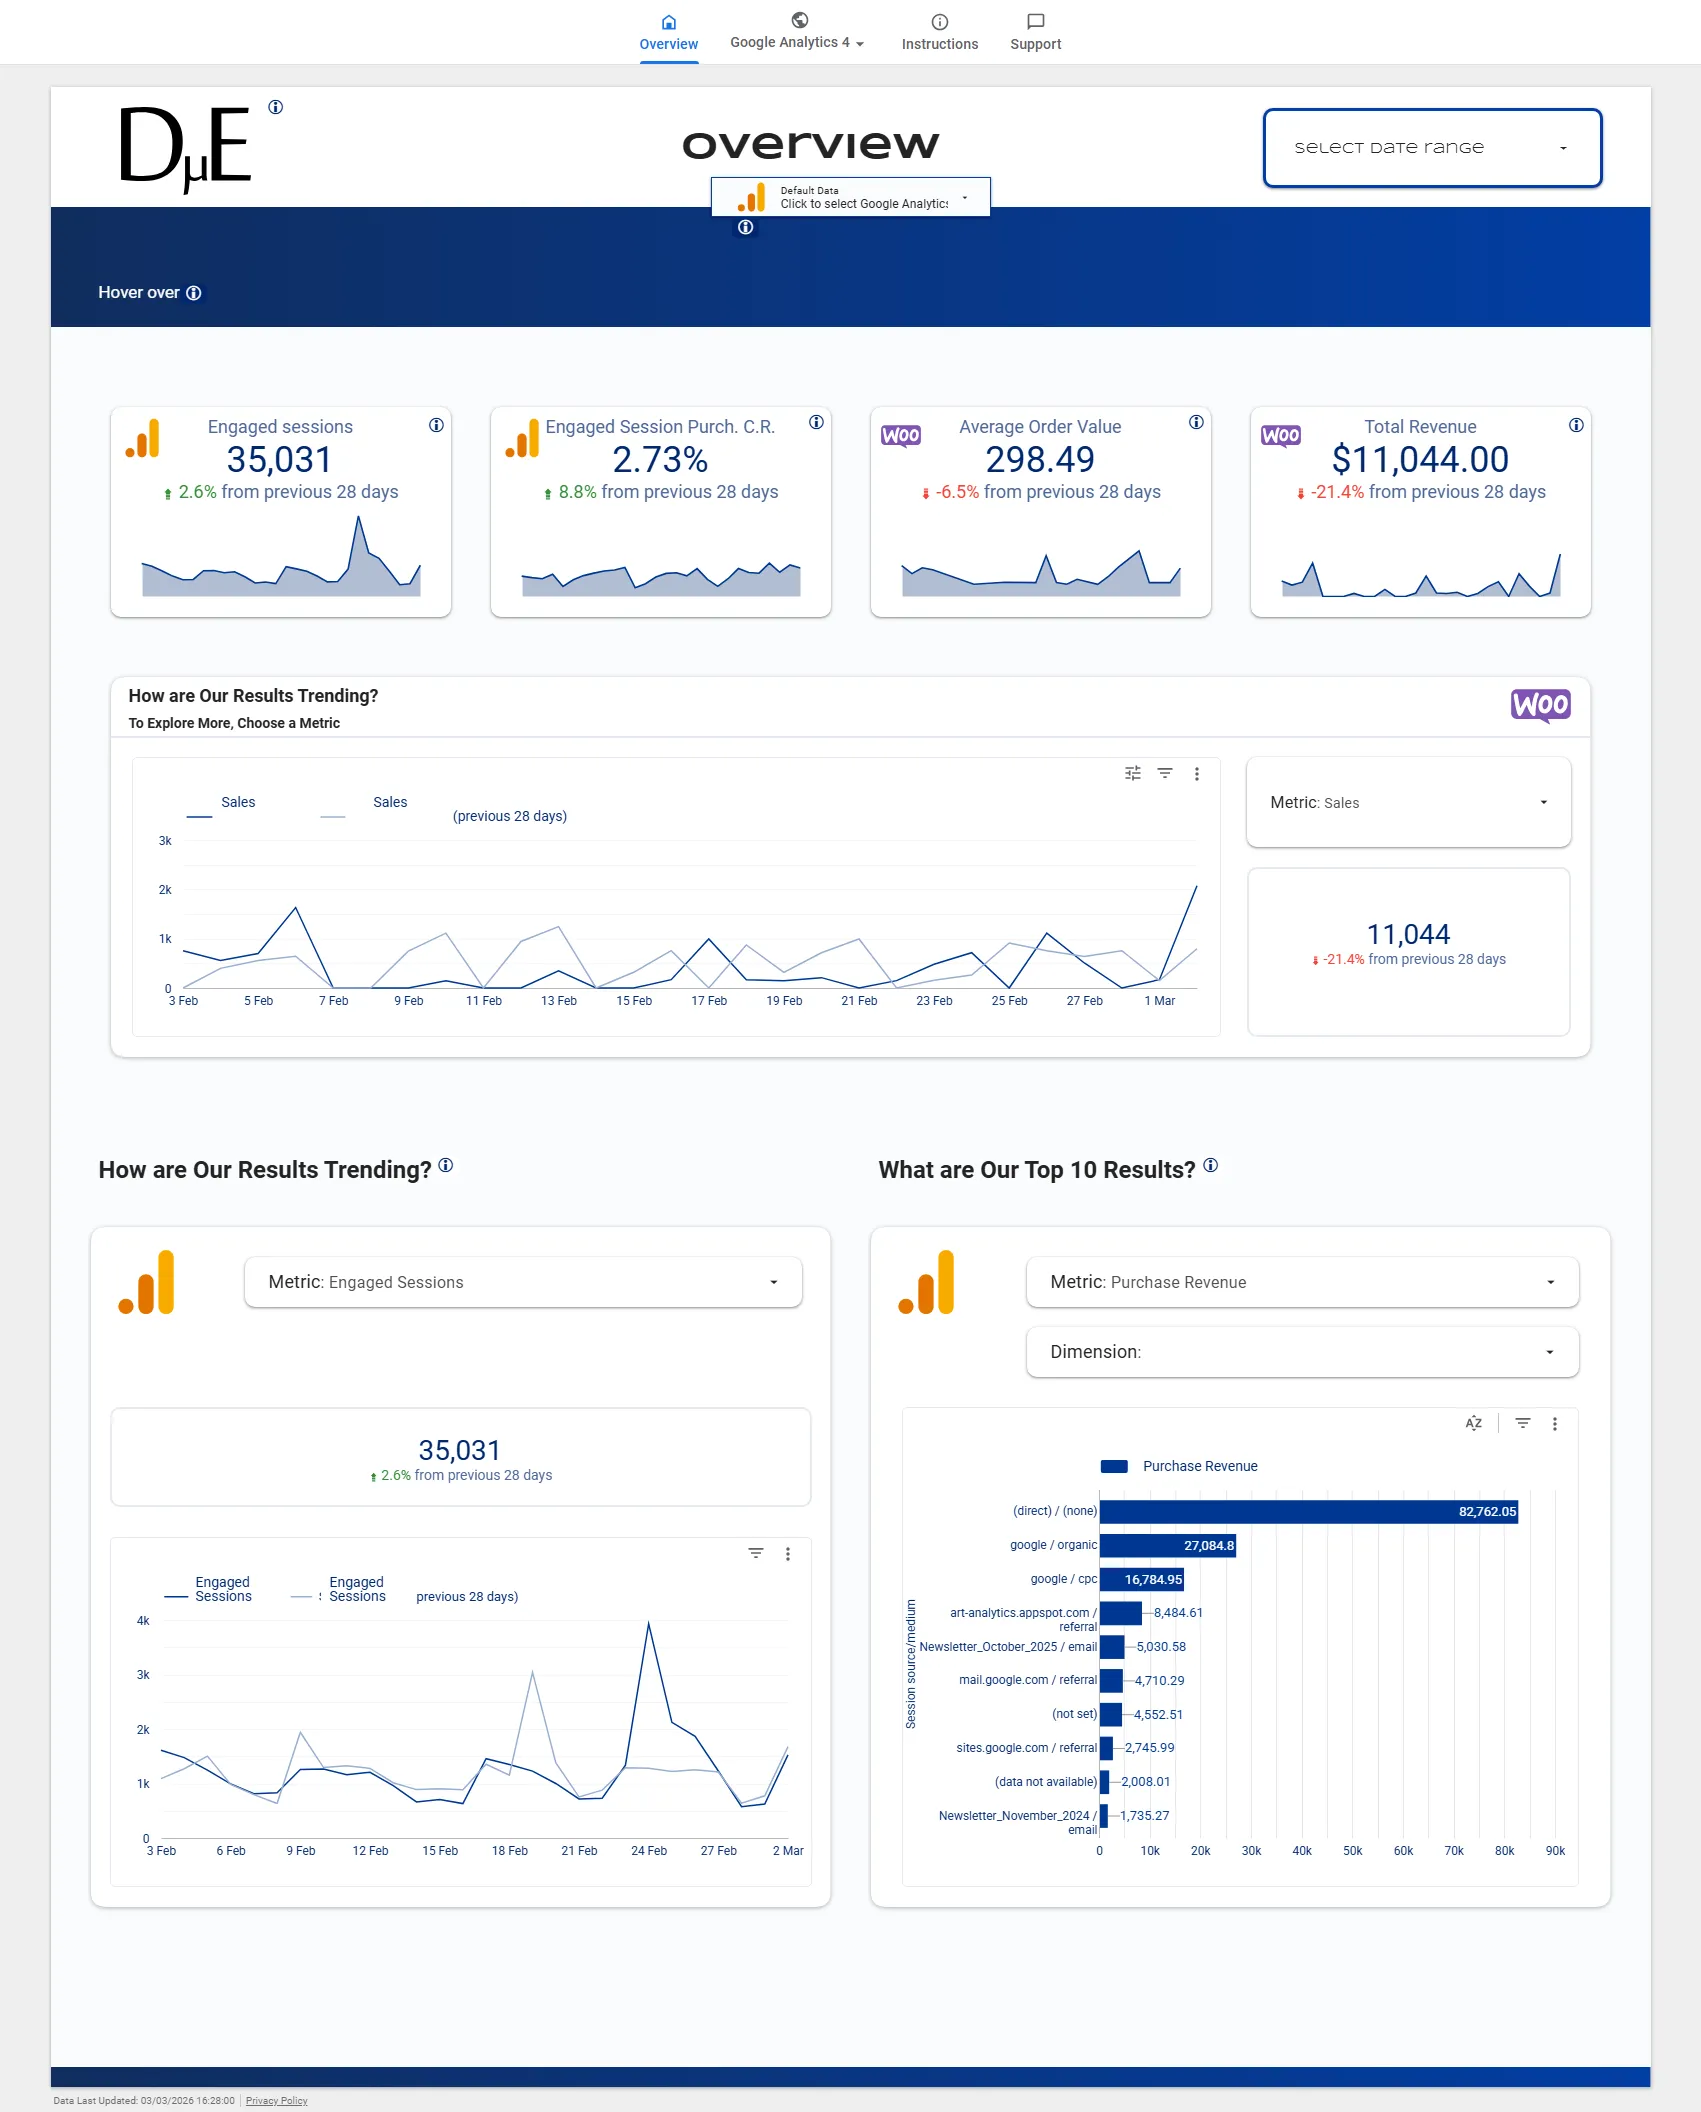
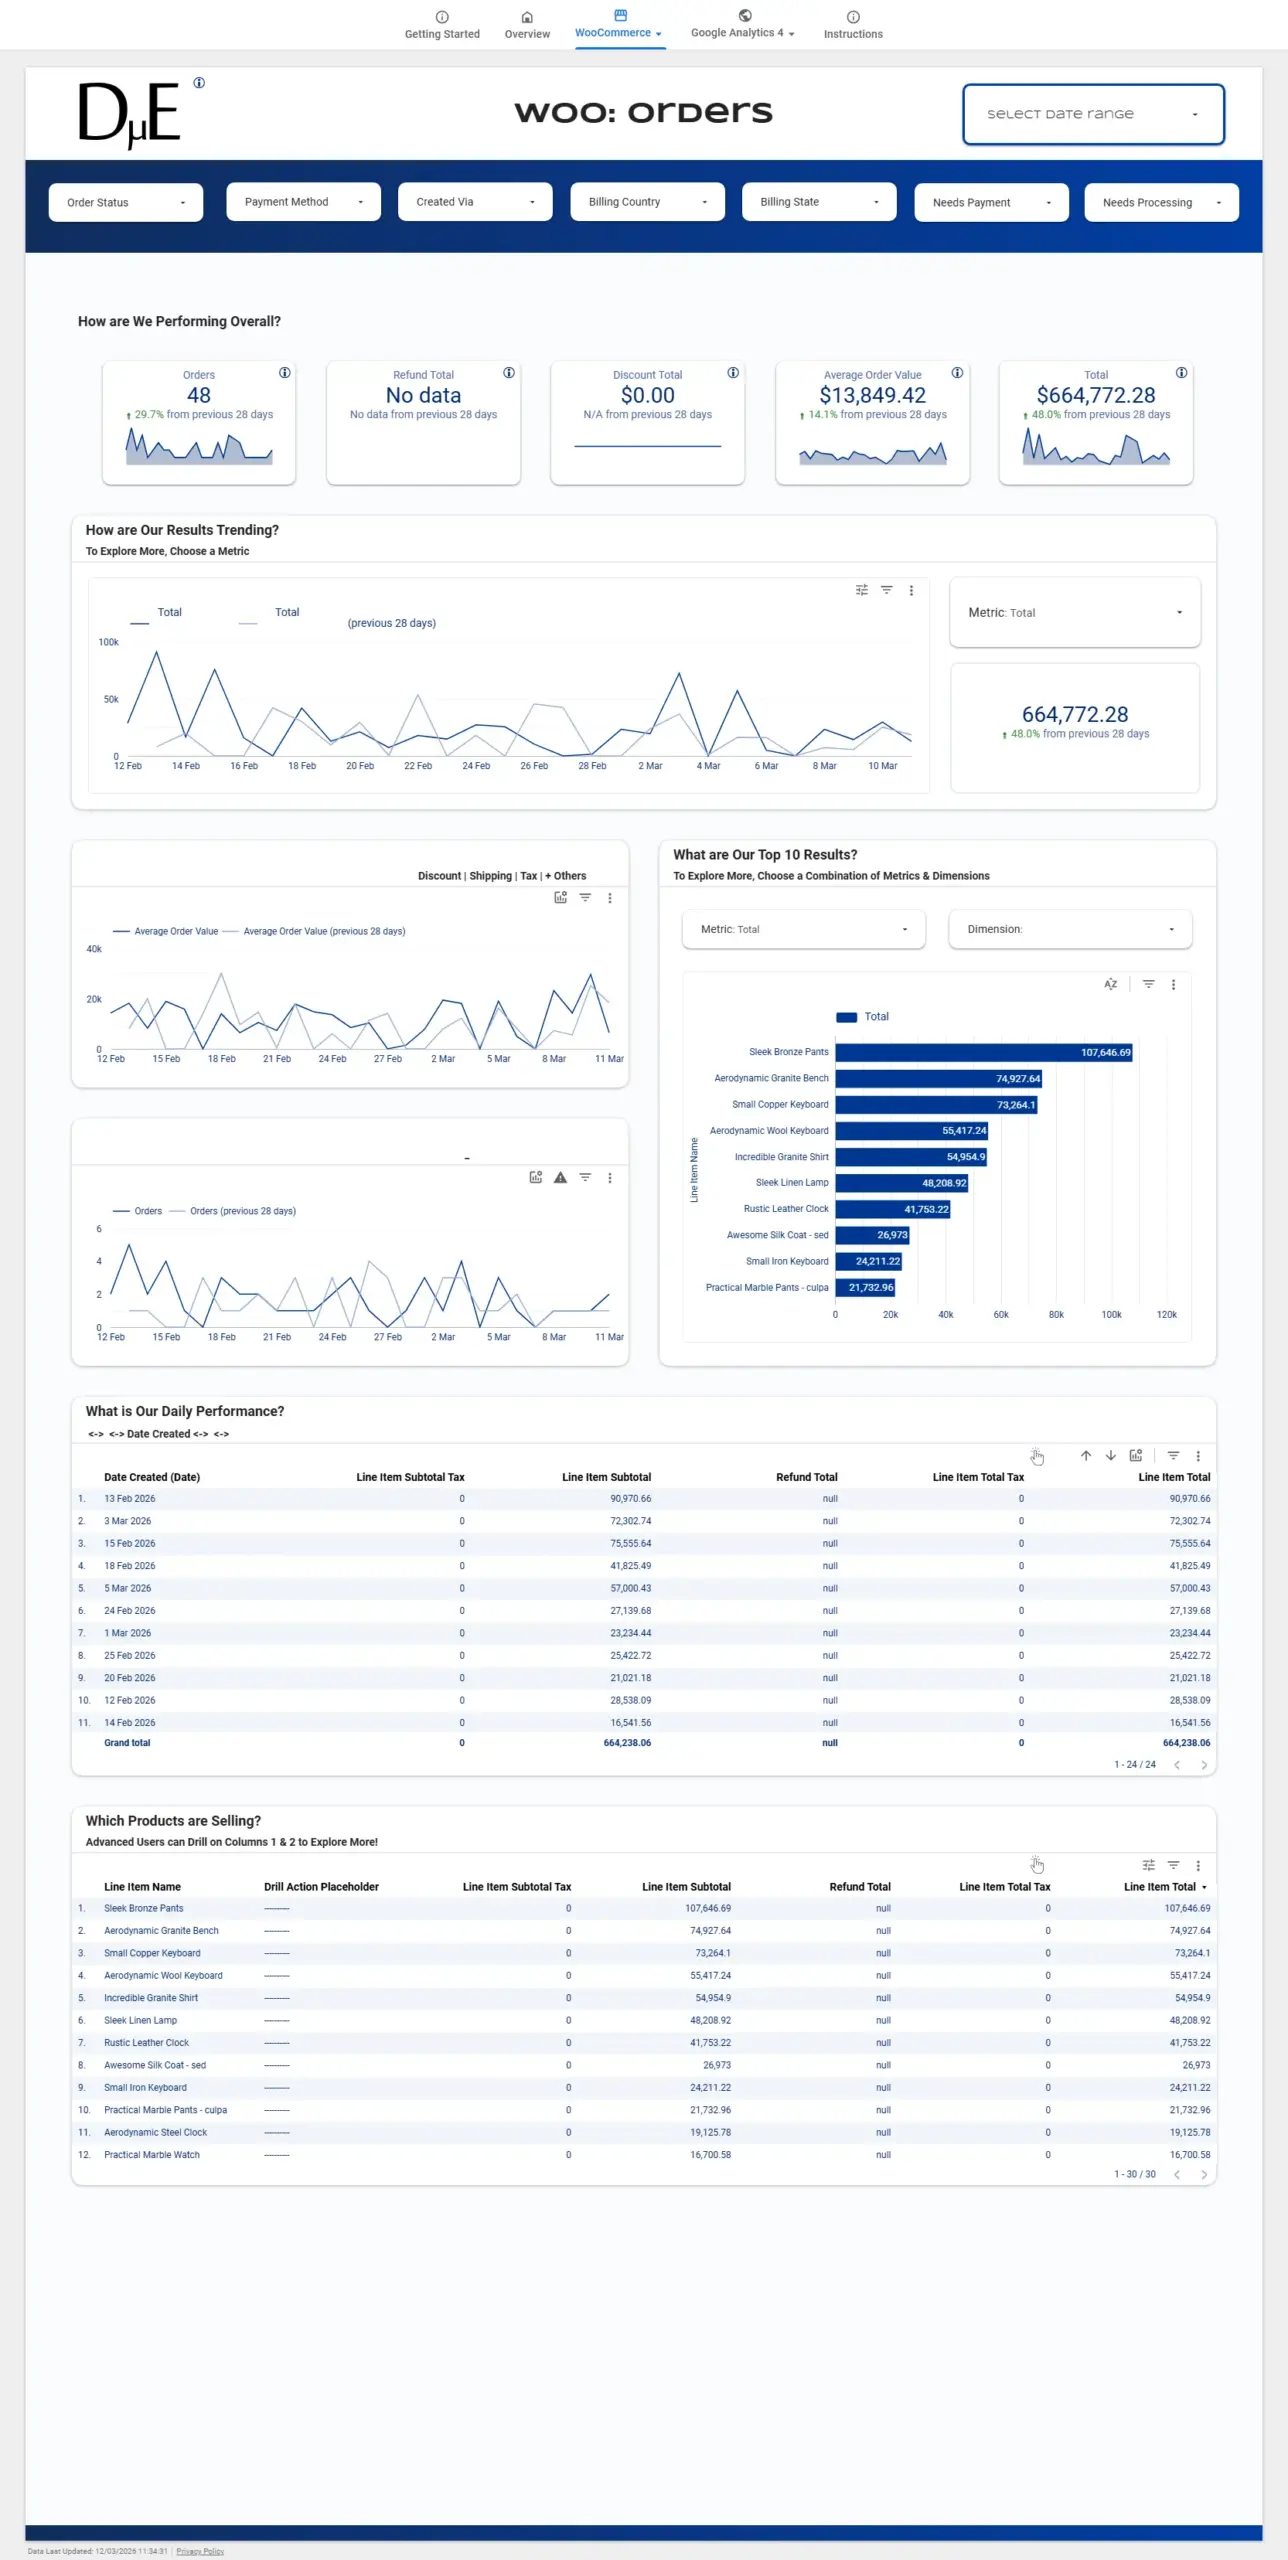
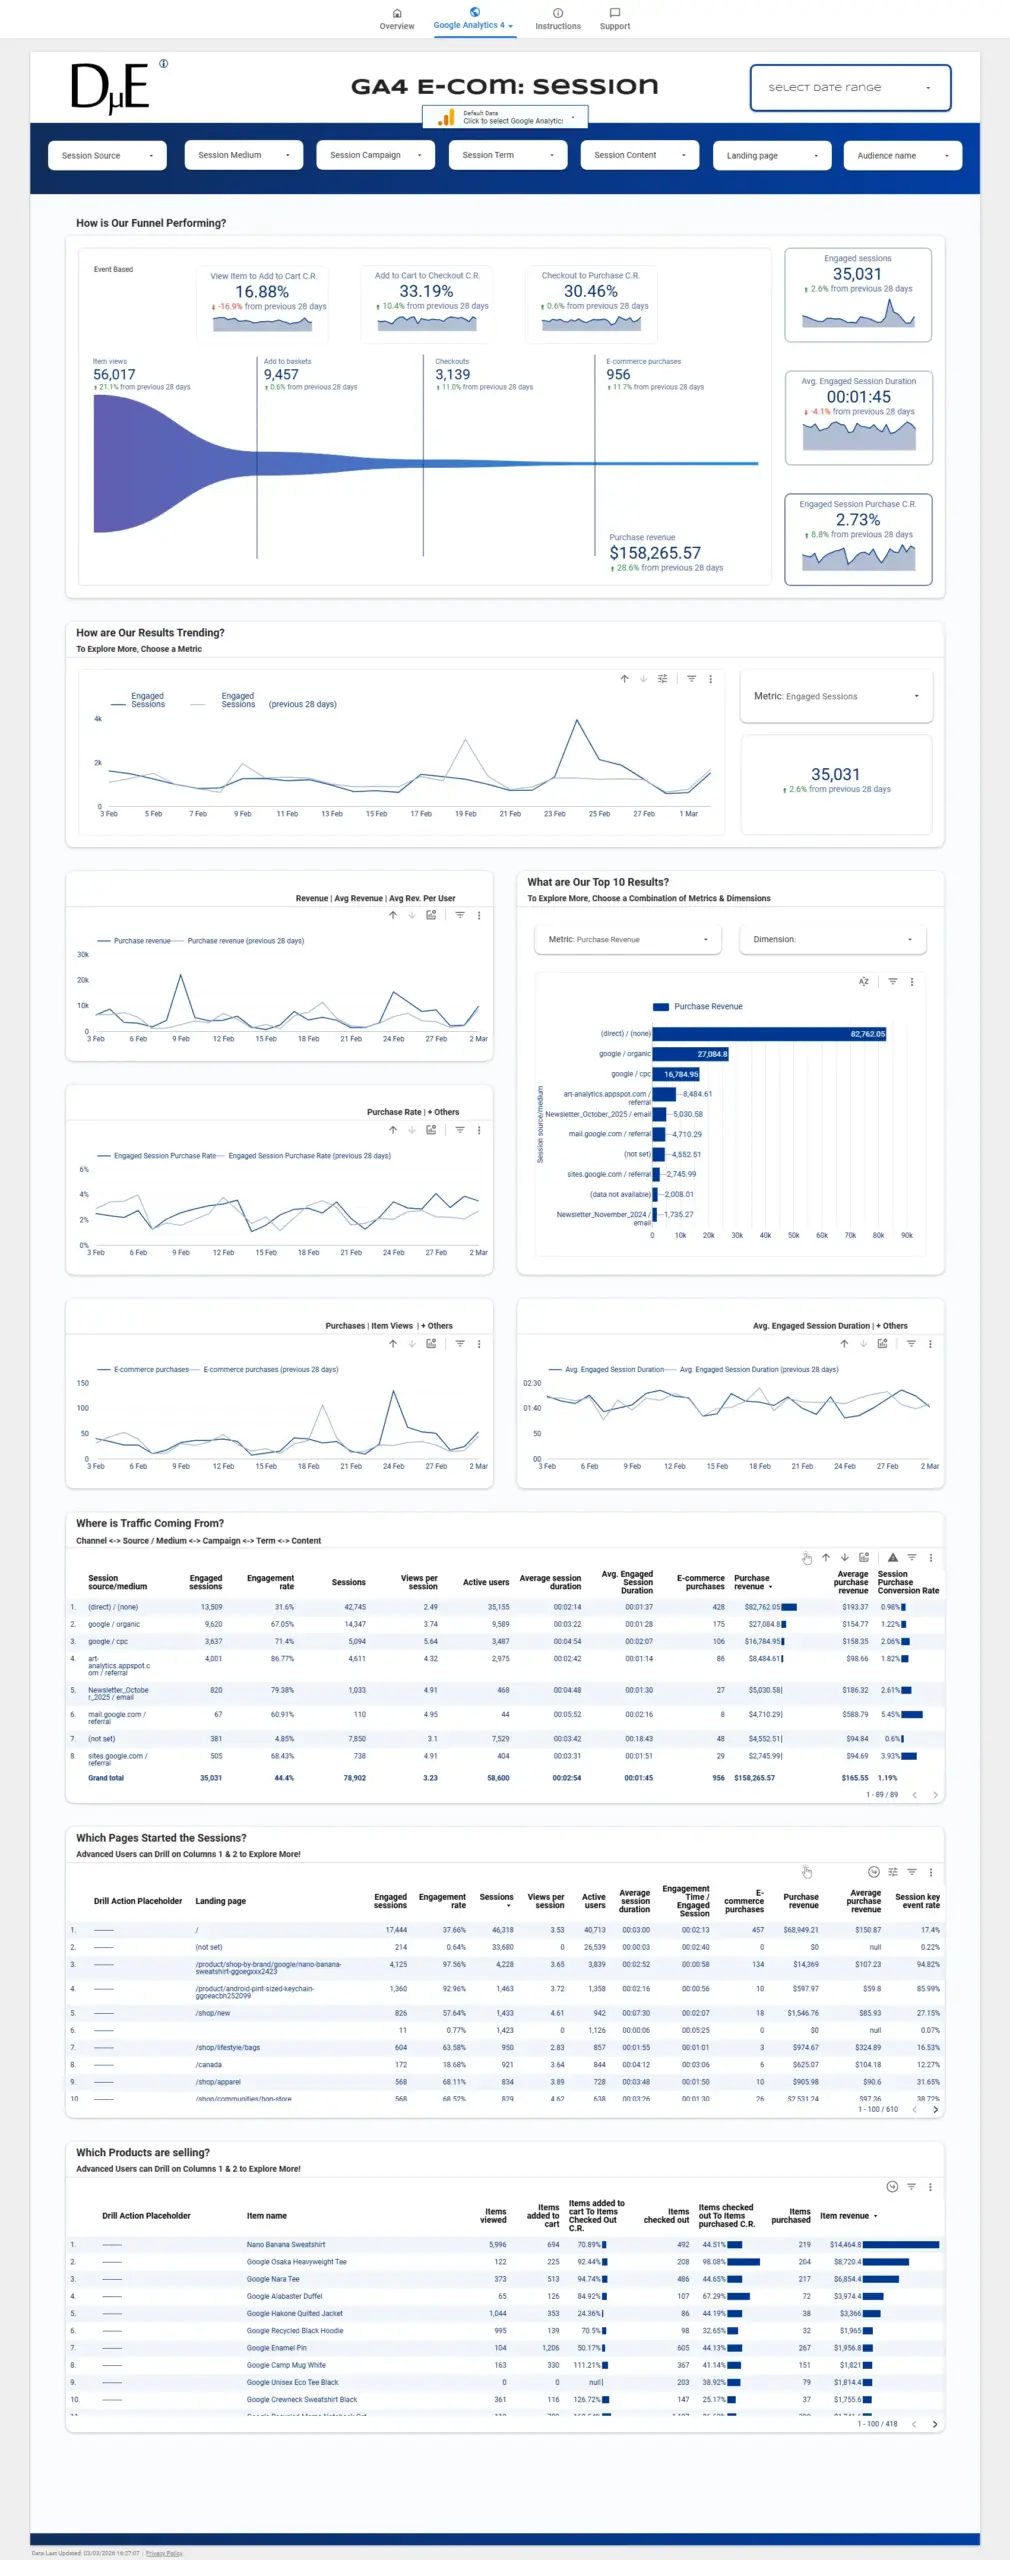
Once a WooCommerce Domain has been added to the Looker Studio Connector, you can start creating Actionable Dashboards. The fastest way to get this done, is to use one of the included Templates. If you prefer to start from scratch, you can Configure a Data Source.
Configure a Data Source to Start from Scratch
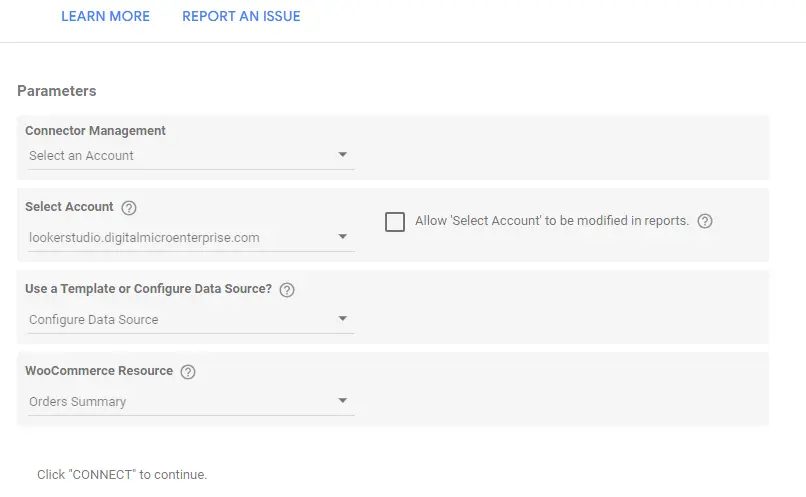
To configure a data source:
- From Connector Management, choose Select an Account.
- Click Next.
- Select the WooCommerce domain you want to use from Select Account.
- Click Next.
- Select Configure Data Source from Use a Template or Configure Data Source?.
- Click Next.
- Select a WooCommerce Resource.
- Click Next.
- There may be more configuration for some WooCommerce Resources such as Reports.
- Click the CONNECT button to the top right.

Use a Template to Start Fast!
Use the included WooCommerce Looker Studio Templates as is or as a starting point for your Actionable Dashboards.
- From Connector Management, choose Select an Account.
- Click Next.
- Select the WooCommerce domain you want to use with the template from Select Account .
- Click Next.
- Select Use a Template from Use a Template or Configure a Data Source?.
- Click Next.
- You will now be presented with links to WooCommerce Looker Studio template.
- Right Click the link you are interested in checking out and use the menu presented to either Open or Copy the link.
Note, there is currently a bug in Looker Studio config screen that causes to shift to the right when a long link is clicked. Since there is now horizontal scrollbar, you will not be able to shift back left and thus, have to refresh the browser.

About WooCommerce
WooCommerce is a free open-source plugin for WordPress that allows users to create an online store, sell physical and digital products, manage inventory and shipping, and accept various payment methods.
About Looker Studio
Looker Studio (formerly Google Data Studio) is a visualisation and reporting tool offered by Google. With Looker Studio, users can connect, transform and visualise data from various sources, creating dynamic and interactive reports and dashboards. There is a free and a paid (Pro) version of Looker Studio
Frequently Asked Questions
Do I need to enter a payment method to try the WooCommerce Looker Studio Connector?
No, no payment method is needed to try the WooCommerce Looker Studio Connector.
What is the difference between Google Data Studio and Looker Studio?
There is no difference! Google Data Studio is now Looker Studio!
In December 2022, Google renamed “Google Data Studio” to “Looker Studio”. This was done to unify all their business intelligence tools under the Looker brand. So, Looker Studio is essentially the updated and improved version of what was previously known as Data Studio.
Can I use the free Solo plan after the trial period?
Yes. After the initial 14 day trial period of the plan, if there is no payment method, payment will fail and the plan will be automatically canceled. However, if you remove paid connectors from the plan, it will be made active. You can then use Early Access connectors until their status changes.